Showing posts with label Tutorial Collection. Show all posts

Thursday, June 17, 2010

Homegrown Bouquets for Giving


cutflowers1

Taking fresh flowers when visiting friends & family is one of my favorite things to do. Everyone appreciates the gesture, & flowers are perfect for every occasion. Plus, when you've grown them yourself, they are extra special & impressive! : )

Since March, when our garden began bursting into bloom, I've been gifting flowers left & right. It all started when I took my mom & dad a bouquet of pink heirloom roses & rosemary for their wedding anniversary, arranged in one of the canning jars I was returning to Mom. The simple beauty of that arrangement & the joy I got from giving it to them really inspired me. Since then, I've tried to take a homegrown floral gift whenever I'm invited to someone's home.

cutflowers2

The bouquet pictured here is one that I took to my mother-in-law as a housewarming gift when Patrick & I first visited their new home in late April. It contains Verbena, Spanish Lavender, Gaura, Rosemary & California Poppies. Granted, none of these flowers are very hardy, so not usually recommended for cut flowers. They are delicate & droop & wither after a day or so, but I don't mind. Their beauty is fleeting, which to me, just makes them more amazing & worthy of our adoration.

ribbonjar
 my ribbon stash; saved from gifts & packaging & project scraps

Tips for creating your own homegrown bouquets:
- Save empty food jars & bottles of interesting shapes to use as vases; you'll want to have them on hand when the need for a host/hostess gift arises! Plus, it's a great way to reduce/reuse/recycle. I used an olive oil bottle for the arrangement pictured here.
- Tie a ribbon around the mouth of your vase to give it that finishing touch - tres shabby chic!
- Put a few inches of water in the vase before adding the flowers.
- Check for bugs on each stalk; you don't want to gift those tiny stow-aways!
- When arranging the flowers, start with the tallest ones in the middle, then add shorter ones around them.
- Keep turning the vase around as you add the flowers, to ensure that it looks pretty from all angles.
- I aim for an interesting mix of flowers that are tall & short, large & small, bold & delicate (in form & color), and upright & billowy. However, a gorgeous arrangement can also be made from only 1 or 2 kinds of flowers. Just trust your own eye - flowers are so pretty that it's hard to go wrong!

Thursday, April 8, 2010

MADE: Little Giraffe Fabric Sculpture


smallgiraffe_blue


I made something new yesterday! I'm loving creating fabric sculpture with the help of my new favorite craft product, Fabric Mod Podge! It's a fun way to use up scraps in your fabric stash. Trims, buttons & beads also make great additions.

I wanted to make a tutorial out of this, but it's more of an intuitive process than a step-by-step, and I wasn't very thorough about the photo-taking. But I'll share some pics of my process with you, & if you enjoy sculpting, just go for it! There's no right or wrong way to do it.

giraffe_step1

The Fabric Mod Podge acts as a glue & sealer in one, and it's specially formulated for use with fabric; regular Mod Podge will not work as well for a project of this nature (trust me; I've tried it). I use a small foam brush for most of the application and old junky paintbrushes for more detailed work. It's also good to use a wax paper-covered surface to work on if you want to protect your table. I've made a small, portable work surface by covering a piece of cardboard with wax paper & taping it on the back.

First, I coated a piece of checkered fabric with the Fabric Mod Podge (FMP) to serve as my background. I have found through trial & error that your finished piece will look better if the background material is coated. During the creation of your masterpiece, you may get some unintended gloops of FMP here and there that look messy on an otherwise uncoated piece of fabric. But if you coat the whole thing, they will just blend right in!

When that coated piece of fabric was mostly dry, I used a bit more of the FMP to glue the fabric to a piece of bristol board. Then I attached my first piece of brown fabric for the body of the giraffe. It was an irregular oval-shape piece that I rolled into a tube & glued the bottom sides down. You can see in the photo above that I also brushed some FMP onto the top side of the body in one area, to make the fabric stick to itself. I just wanted to get rid of some of the puffiness of the tube, but didn't want to completely lose the 3-D quality of the rolled fabric.

giraffe_step2

Then I glued down a piece of twill tape I happened to have alongside the body to create the giraffe's mane, tucking it under the body. Almost any kind of trim, or even a contrasting fabric, would make a cute mane.

The next step of attaching a second piece of fabric for the head is where it starts to get trickier. I attached the fabric in a small spot that I knew needed to be glued down, then played with it a bit. I like to practice a few different folds & twists to see what I can come up with before gluing the rest down (being gentle with the fabric & not pulling too hard, because it does take a few minutes for the glued area to dry). You just have to go with the flow, enjoy the sculpting process & try not to get frustrated.

giraffe_step3

So I folded the piece down & attached it with FMP to create the giraffe's jaw line. Then I did a twisty-foldy maneuver to create his head & one ear, which I neglected to take pics of. It was kind of difficult, because I was holding & folding with my left hand & gluing with my right - sorry!  : )

giraffe_step4

Here's the head & one ear all folded into place & glued down. I folded the mouth part under & created a rounded edge to it. I also added spots cut out of a cute floral fabric. I had coated these with FMP & let them dry before gluing them on (mainly because of that mess factor I mentioned when talking about the background - they just blend in better if coated).

I like to keep some of the fabric un-coated though to create some textural contrast between the stiffer, shinier, coated fabric & the fabric in its natural state. You can see that parts of the head & body are left uncoated - they have a softer look to them.

Again, I neglected to take pics of the final steps, but here's what I did:
- made the other ear out of a small piece of fabric & glued down
- cut a small piece of coated polka dot fabric for the muzzle
- rolled 2 little horns out of the same polka dot fabric (uncoated)
- glued on a button eye
- cut off excess mane & body fabric hanging at the bottom
- framed it in a thrifted picture frame that I had spray painted blue & voila!

Have you tried Fabric Mod Podge yet? If so, what did you make?


Saturday, March 27, 2010

Clever Easter Egg Dyeing Tricks


I've been seeing a lot of great Easter crafty goodness here on the interwebs lately, so I wanted to share. The technique above is my absolute fave - these eggs, spied on Craft, were made by using electrical tape to create stripes. That's genius! Great results that look pretty fancy, but this would be so easy to do!

Design Sponge
also featured an egg-dyeing stroke of genius:


This technique would be more time-consuming than the electrical tape one, but still looks quite easy to do. It's a simplified version of the traditional Ukrainian hot beeswax technique, which I wrote about last Easter. Design Sponge has a full-on, step by step tutorial that makes it look like a cinch!

Do you have any plans to dye eggs this Easter? What's your preferred method?

Thursday, February 11, 2010

Quirky Valentine Idea #2: Monsters!


Tamara of Art, Adventures and Toddler has made *the cutest* Valentines ever! Yes, I mean that. The cutest Valentines in the history of all Valentines. I can't get over how silly-cute they are! I was alerted to this tutorial by the always on top of it folks at Craftzine. I highly suggest you subscribe to their e-newsletter or blog feed if you haven't already; it is awesome.

Tamara has kindly put up a full tutorial on how she makes these cards, so you can make some with your own delightful little characters.

And not to worry if you have a sewing machine aversion, you could sew these by hand or skip the sewing all-together & just opt for glue. I think the stitching definitely adds to the cuteness factor, though.

If you're finding yourself short on time to get Valentines made, check out my printable birdy Valentines, Fun Freebies I made just for you! xoxoxo

Monday, December 21, 2009

4 days 'til Christmas! {plus identity issues}


I hope you're relishing this beautiful time of year and spending time with those you love. I'm definitely enjoying a deliberately slower pace of life this week. The WonderCraft is now {mostly} on hiatus until the new year, so I've been able to spend more time with P (my hubs), going to movies, trying new restaurants and strolling through shops looking for gifts and then wrapping them with love (I love wrapping gifts!). Wanted to share a couple of online joys with you today...

First up, how unbelievably cute is that little gingerbread house perched on a mug?! I first saw it on Craftzine, where I go for my daily dose of crafty goodness. Head over to not martha for more cute pics & the full tutorial.

And secondly, The UK Times Online has just published their list of 50 of the world's best design blogs. A few blogs that I read almost daily were awarded this honor, well-deserved. I've spent this morning checking out the others on the list and adding several to my ever-growing left sidebar here. I encourage you to check them out for some serious eye-candy & inspiration!

The blogs on the list, such as pia jane bijkerk, really inspire me to re-think Crafty Mishmash... which puts me in a bit of a funk. I feel like what I'm doing here is at odds with my true style and design aesthetic, and I'm always trying to fine tune things for a more harmonious blend of my playful, whimsical Snuggle Herd work and "the real me" which is still playful & whimsical, but more romantic/dreamy/retro/sophisticated (I think). Seems like I've been struggling with this disconnect throughout my entire art/design/craft career, with my work always coming out with a more clunky, childlike look than I would like.

The photo above, found in pia jane bijkerk's kids' gift guide, of the darling little girl is from Mette, an Etsy shop based in Vancouver. I love the styling of their photos! I want to move toward this type of look in my photography for my Snuggle Herd products. Adorable children modeling the clothes definitely changes the mood and tone of the pics. They look classic, timeless and so sweet! Obviously my clothing designs are not quite the same, but I think I could come up with something along these lines that works for my designs. If I can find some kids to model for me, and talk P into doing a whole slew of new photos, of course.

And so I may be tweaking Crafty Mishmash a lot in the coming days, so bear with me. It's just that I often look at my blog and think, "this isn't really me." Know what I'm sayin'???

Tuesday, December 15, 2009

DIY Shimmery, Snowy Candles


Look at these beautiful candles! You wouldn't believe how simple they are to make: Take some pillar candles & coat them with Mod Podge, then roll them in a tray of epsom salts. That's it! Isn't that a nifty trick? Emily shared this super-crafty how-to on her blog, Remodeling This Life.

I found the link over on another lovely blog, The Inspired Room, where Melissa shared her own beautifully simple idea for epsom salt "snow" in a jar. Wow! So easy and so festive, yet not Christmas-y. I like that you could decorate with these candles throughout the entire winter. Thanks for the great ideas, ladies!

Wednesday, December 9, 2009

Unique & Practical Winter Gift Ideas


Wonderful holiday gift guides abound online, so instead of making my own gift guide, I just wanted to highlight a few inspiring gift ideas I've seen on the web lately. Any of these would be gifts I'd love to receive (hint, hint!) because they are all about making the cold days of winter more comfy-cozy. I've also put links to a few of the coolest gift guides I've found at the end of this post. Enjoy!

The Woodland Draft Buster from Betz White is so cute! You can find the pattern in her book, Sewing Green. The book itself would make a lovely gift for someone crafty, but if you have the time, why not buy the book as a gift to yourself & whip some draft dodgers up for your loved ones? Helping them stay warm & cozy this winter would be a wonderful gift.


This next project is totally tempting me, because my skin gets horribly dry during the winter. I'm sure you have someone on your list who also suffers this winter affliction, so how about making them an indulgent brown sugar scrub?

Find the incredibly simple instructions on Craftzine and get to it! This is one that children will love making, too. Mix it up, put it in a jar & use fabric scraps & ribbon to pretty it up - so easy!


Lastly, a fashionable & functional classic: a pretty scarf. This scarf has a twist though: it's made from an old sweater (yay, upcycling!) & gathered using a long ribbon (clever!), so that it has a very ruffly look. How pretty is this? and it looks like it would keep your neck nice and warm (very important for short-haired girls like me)! This project is another one from the amazing folks at Craftzine. Check out the Sew a Ruffled Scarf post for a detailed how-to. Don't be scared; it actually seems very simple to make as long as you have basic sewing skills.

Wouldn't any of these make a fantastic, thoughtful gift? Sure wish I had started on them earlier... maybe I'll be able to make some gifts for Christmas 2010, if I start now! Oh well, if you're in a time crunch like me, you can still find tons of fabulous gifts online by checking out the gift guides below. Or better yet, shop at your local craft shows & support handmade! If you're in Austin, come out & see me at Cherrywood Art Fair this weekend!

Great Holiday Gift Guide Roundup 09:
- under $50 gift guide from design*sponge {they have many gift guides to browse; see their full list}
- Slow Holiday gift guide from Treehugger
- and of course, there's a plethora of gift guides on Etsy!

Happy shopping &/or making! Please leave links to your fave gift guides or DIY gift ideas in the comments!

Thursday, December 3, 2009

Crafty, Upcycled Wreaths


Here are some fabulous ideas from Alpha Mom for creating unique holiday wreaths from materials you probably already have around the house. I saw these in the Craft daily digest, my fave e-newsletter chronicling the online crafting universe. I'm sure I won't have time to make any of these this month, as I am so busy, busy, but I hope you will try them!


Alpha Mom has written a very detailed post with great pics & how-tos for wreaths made of recycled items like toilet paper tubes and plastic lids, even one using painted ping pong balls!

My favorite wreath, a most surprisingly elegant one, is made from a plastic milk jug! Be sure to check out Alpha Mom's post for the full tutorial on each type of wreath.

Thursday, September 24, 2009

DIY "Fame"-inspired Duffel Bag!


The always-craftastic Craftzine featured this really well-made Threadbanger tutorial on how to make your own 80s-style duffel bag from old umbrellas & cloth belts! So cool! I just had to share it. Someone needs to make one of these, like, totally! Not me because I have a long list of half-finished projects as it is, like my kitchen cabinets & these one-yard skirts (haven't even started one of those yet, but I so want to!). If you make one of these awesomely 80s bags, be sure to let me know so I can share your pics!

Friday, September 11, 2009

Felt, hmmm?


I've never really been into felting wool or making things from felt. It always looks gorgeous & I admire other people's work in this medium, but I've just never gotten into it for whatever reason. But today Craft alerted me to this gorgeous felt pillow with rosette clusters from Felt Furnishings: 25 Accessories for Contemporary Homes by Anne Kyyro Quinn. The Storque even has a tutorial up for making the pillow. It's so, so beautiful! Uh-oh, I think I hear a new craft calling my name...


Also check out Anne Kyyrö Quinn's studio to see examples of the fabulous, three-dimensional interior textiles they produce. Coolness!

Friday, August 7, 2009

I want finches. Pretty little finches.


Look at them! They seem so peaceful and sweet. These beautiful feathered friends happen to belong to Susie Ghahremani of boygirlparty, whose work I love. She says, "Every day they give me a reason to be happy, the finches are so simple and so cheerful - always doing something tender and sweet like preening each other or singing softly." Awww! They were featured in Craft's recent pet series.

The series involved interviews with pet-lovin' crafty folks & had some really cool ideas for birdie crafts, like this DIY aviary from Empress of Creativity. How cool is that?! I totally want one of those. Not like I have any room in my humble abode for it...


I also want a chirpy little pal for whom I can make one of these:
Jessica Wilson gives you a full tutorial for this nifty Birdie Potpourri. Wouldn't it be fun to watch your bird pull her favorite ribbons out & make a spiffy, colorful nest with them? Maybe I'll just make some to hang on the porch & see if any wild birds appreciate it.

It just seems like having little songbirds like finches in the house would make my quiet, work-at-home days so much more cheerful...

Of course, it would probably be absolute mayhem with this trickster around.

Any of you out there in blogland have any stories of co-habitating birds & cats? Is it possible? A nightmare? I'd love to hear!

Wednesday, July 22, 2009

Adaptive reUse Explains How to Deconstruct Tin


I was very excited yesterday to see that Austin's own upcycled jewelry superstar, Christine Terrell of adaptive reUse, was featured in Craft! Christine's jewelry is just the best - she makes wondrous & amazing things from old tins. Craft featured a great post from Christine's blog detailing how she takes apart those tins. It's a very interesting read - I had no idea just how she did it. It is no easy feat! So if you're curious too, hop on over and read her post, "Tin Deconstruction."

photo by Christine Terrell


Here's a pic {apologies for the blurriness} of my own adaptive reUse piece, a beautiful red rose. It's a real favorite of mine & I always get tons of compliments when I wear it. I love being able to tell people about the local artist that made it! I know Christine through the EtsyAustin team, and she is wonderful. In fact, I've been meaning to feature her on Local Talent Tuesday, but as you may have noticed, I've been slacking a bit with those blog posts. It is a very exciting time for me right now, with the upcoming launch of The WonderCraft, but along with all of the excitement has come a ton of work and filled-to-the-brim days (and nights) trying to get it all done. I hope to get back to posting more frequently in the near future. Until then...

Monday, July 13, 2009

One of the coolest quilts I have ever seen...


This is the cutest quilt ever with its prominent circle designs. Of course quilt blocks have to be square, so the artist, Jennifer Murphy, has an ingenius method for making them. And you can learn how she does it - she has the tutorial for this quilt up right now on her blog. Run & get it - it's a great one! And thanks to Craftzine for sharing this one today in their newsletter.

Thursday, July 2, 2009

Have a fun Fourth!


Did you see these on Craft's blog? Another fabulous find: colorful 4th of July fireworks that send confetti flying into the air. Check out the tutorial for these cool Confetti Popper Rockets from Brenda at Alpha Mom. Here's hoping you have a fun & safe holiday weekend!


photos by Brenda Ponnay

Friday, June 19, 2009

Grosgrain: 20 Minute Simple Skirt Tutorial AND GIVEAWAY!!!!


This is the cutest & EASIEST skirt technique I've ever seen! I'm definitely going to make some of these. No really. I am. Just wait.
From Kathleen of Grosgrain. Grosgrain: 20 Minute Simple Skirt Tutorial AND GIVEAWAY!!!!

Thursday, May 21, 2009

Twine-wrapped Mason Jar Vases


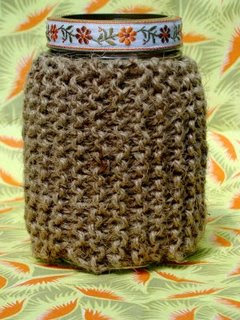
How cute are these?! They seem very simple to make, & they'd be perfect for some al fresco entertaining this Memorial Day weekend! Pop on over to Vickie Howell's blog for the full tutorial. She even has a knitted version, if you're so inclined.

Thursday, May 7, 2009

Get Crafty for Mom


Sunday is Mother's Day, so be sure to tell yours that you love her. Why not do it in an extra-special, creative way while you're at it? Here are some treats Mom is sure to love!


Diane Gilleland of Crafty Pod has written an excellent tutorial for an envelope photo book over on the Craft blog. I really like this style of book because you can sort photos by theme & simply place them in the envelopes, instead of having to mount them and create a nice layout for the pages. Don't get me wrong, I love a well-made scrapbook with all the bells and whistles (the kind that my sister makes), but I just never seem to find the time to finish them.

Another idea, especially nice because of its recycled nature, is to make a little basket like these that Emily of red bird crafts dreamed up. So pretty, and they're made from empty rice pilaf boxes! Check out Emily's hanging basket tutorial. These little lovelies would be great for flowers, a mail catcher, or any number of things.

Monday, April 27, 2009

Tutorial: Hammered Flower & Leaf Prints


While skimming through my latest Craft Magazine email update, my interest was piqued by the entry "How-To: Simple Botanical Prints." I love botanical prints & illustrations. Flowers are one of my favorite subjects to draw, and I've a tendency to want to capture their EVERY detail.


A lot of times when I see a flower or leaf that has interesting contours, I'll think about what a cool illustration it would make, but then I decide not to do it because I know I will get obsessive about the detail, making it a time-consuming & somewhat frustrating drawing exercise. Isn't that silly of me? It's ridiculous, I know, but it's true.

So imagine my delight when I saw this tutorial for hammered flower & leaf prints, written by Wendy of Build/Make/Craft/Bake. Seems like a great way to capture all the gorgeous details of a flower or interesting leaf, with their original colors, even! You hammer the plant to release its natural dyes, resulting in a beautiful, life-like image. Great for those artists with obsessive-compulsive tendencies, like me. I can't wait to try this awesome idea.
P.s. All the pics here are Wendy's.
Blog Widget by LinkWithin